Low-code Telegram bot for baby sleep and feed tracking
My wife and I wanted to start tracking and visualising our baby's sleeping and feeding schedule to help us understand the rhythms from a day-to-day basis. There are multiple apps to do that and seemingly the most popular one is Huckleberry but at $15 per month, I thought I could make something quick and simple to allow us to get the data we needed.
The requirements were simple:
- Track when the baby has fed
- Track when (and for how long) the baby has slept
- A very simple interface for inputting this data (the fewer the clicks/touches the better)
- Visualise this data in a calendar form
- Make the thing really quickly (I don't have a lot of time to spend on this)
From these requirements, the solution that sprang to mind was to put calendar entries into an .ics file and then have a calendar pieces of software visualise this for us (we use Google Calendar, but as iCalendar is a standard we could have used any client). So that sorted out the output of the system, but as for the input of events, I needed to build it within a few hours and it needed to be super simple to use. Again, a solution sprang to mind for our particular use case: a Node-RED Telegram bot. This made sense to me for multiple reason:
- We already use Telegram, no new software to install
- Telegram is a native app, so no waiting time for websites to load
- I already use Node-RED and have already created Telegram bots in it
So after registering a new bot on the Telegram platform, I started adding nodes to my Node-RED instance. As I wanted this to be as few clicks as possible, I decided to use an inline keyboard to navigate through the options. This first flow creates the top-level options:

The "initial keyboard" node is as follows:
var reply_markup = JSON.stringify({
    "inline_keyboard": [[
                {
                    "text": "Feeding",
                    "callback_data": "FEEDING"
                },
                {
                    "text": "Sleeping",
                    "callback_data": "SLEEPING"
                }]
            ]
  });


var options = {
    chat_id : msg.payload.chatId,
    reply_markup : reply_markup,
};

msg.payload.type = 'message';
msg.payload.content = "Track activity";
msg.payload.options = options;

return [ msg ];
This results in the bot posting 2 buttons when a user types in anything to the chat:
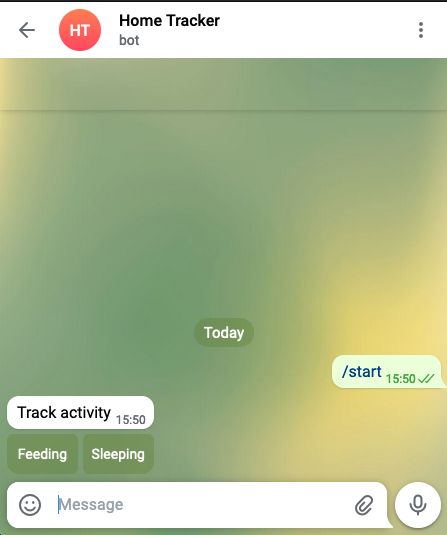
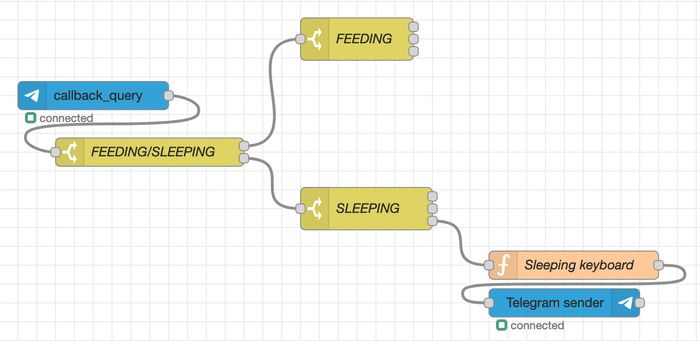
In the Javascript node above, you can see that when the user clicks on the "Sleeping" button, the callback_data to my Node-RED app will include the key "SLEEPING". I use this to post a further inline keyboard with additional options:
This results in a second message and button selection:
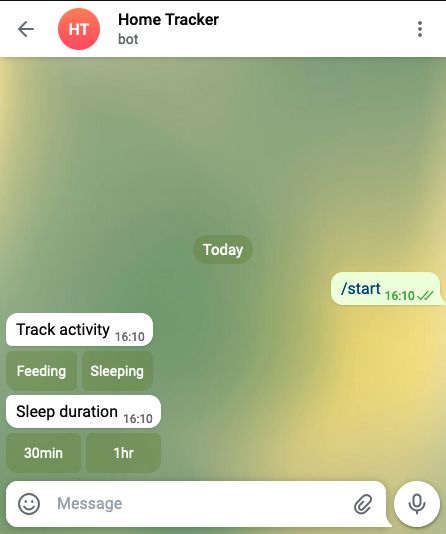
Finally, when we click on either the 30min or 1hr buttons, I want to add an iCal entry into an .ics file.
The nodes for doing this look as follows:
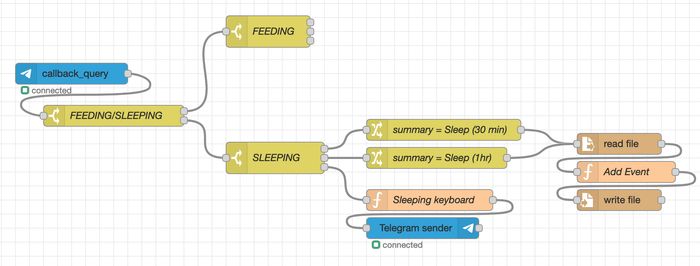
The nodes labeled summary = Sleep (xxx) assign some values which are then read by the Add Event node. Importantly they set:
msg.summary= "Sleep"msg.startTime= `$fromMillis($millis() - (30 60 1000), "[Y0001][M01][D01]T[H01][m01][s01]")msg.endTime=$fromMillis($millis(), "[Y0001][M01][D01]T[H01][m01][s01]")
The last 3 nodes then read the existing .ics file, append a new Event and then write the file back to disk. The Add Event node does all this very simple:
var lines = msg.payload.split(/\r?\n/);

var newLines = [
    "BEGIN:VEVENT",
    "DESCRIPTION:",
    "DTEND:" + msg.endTime,
    "DTSTAMP:" + msg.endTime,
    "DTSTART:" + msg.startTime,
    "SUMMARY: " + msg.summary,
    "UID: " + msg._msgid,
    "END:VEVENT"
];

const allLines = [...lines.slice(0, -1), ...newLines, ...lines.slice(-1)].join(`\r\n`);

return {
    chatId: msg.chatId,
    filename: msg.filename,
    payload: allLines
}
After all this is complete, the Node-RED app then sends a message back to notify the user that everything has been tracked.
The complete flow, including the feeding sub-flow and a sleep timer (which creates an ical event based on the length of time between pressing "start" and "end") is:
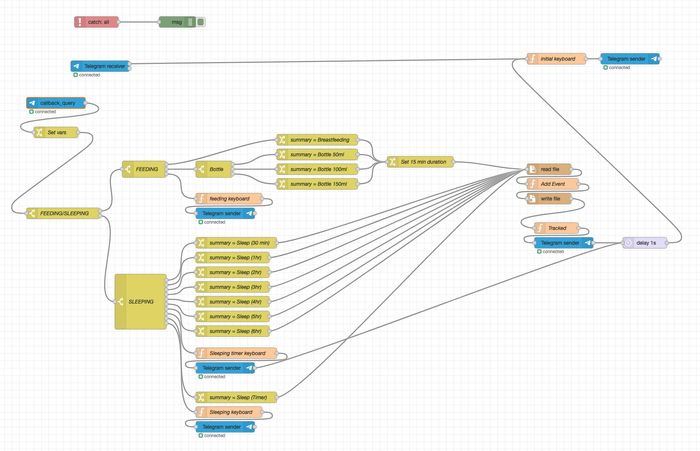
This was tested and works fine for adding events to the ical file. The final bit of the puzzle was getting Google Calendar to display the events. As the file was on my local server at home, I had to expose the file to the internet, and I chose nginx in a docker container to do this. Probably a bit of an overkill but I needed something quick.
Here are the relevant docker-compose entries:
traefik:
container_name: traefik
image: traefik:v2.5
network_mode: host
volumes:
 - ./traefik.yml:/etc/traefik/traefik.yml
 - ./letsencrypt:/letsencrypt
 - /var/run/docker.sock:/var/run/docker.sock

cal-nginx:
container_name: cal-nginx
image: nginx
volumes:
 - /home/user/cal.ics:/usr/share/nginx/html/cal.ics:z
 - ./mime.types:/etc/nginx/mime.types
ports:
 - 4400:80
restart: unless-stopped
labels:
 - traefik.enable=true
 - traefik.http.routers.home-nginx.rule=Host(`cal.domain.com`)
 - traefik.http.routers.home-nginx.tls=true
 - traefik.http.routers.home-nginx.tls.certresolver=letsencrypt
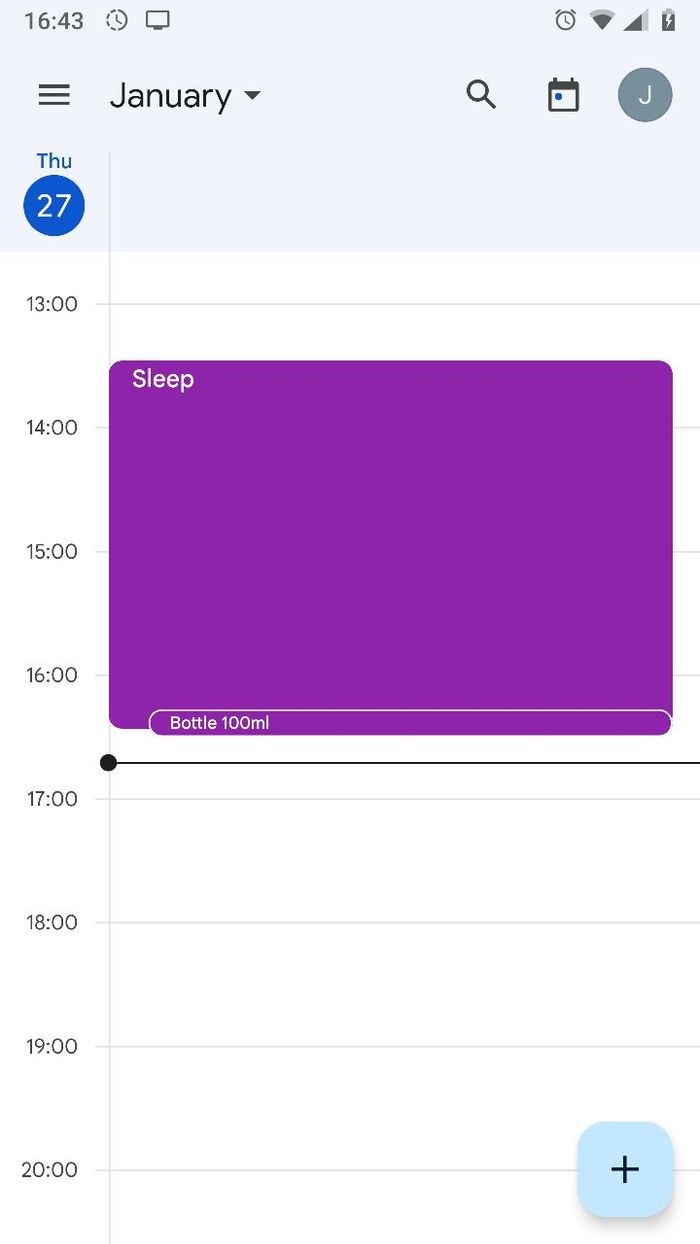
With this setup, my ics file was now exposed to https://cal.domain.com/cal.ics. Google Calendar allows importing from a URL and they claim that they sync this every 12 hours or so. In practice it appears to be a lot longer refresh period than that, and besides we want to see the results much quicker than that. Luckily someone has created a Google AppScript which takes an ics file and replicates the entries to your calendar as often as you like. This is GAS-ICS-Sync. After installing and configuring the script, I can see my entries in Google Calendar:
